Saturday, July 8, 2017

Sip Red Cider Vinegar with the Mother EVERY DAY!


You have probably noticed everyone posting and talking about drinking red cider vinegar with the mother once a day.  I found this to be a big factor in helping me lose weight.  I find that it helps reduce my cravings for sugar.

Check out this website article from Healthy and Natural World which includes more information based on a research study published in 2009.  It states: "The Bio-science, Biotechnology and Biochemistry journal published a study finding that drinking 2 tbsp. vinegar for just three months caused significant decrease in body weight, abdominal fat, waist circumference, and triglycerides." - Healthy & Natural World


Red cider vinegar has amazing properties. Read this article which thoroughly explains how it has 23 health benefits.  Here are some highlights as it relates to weight loss and digestion in general:


Notice the "mother at the bottom."
Red cider vinegar with the mother is the best option.  The mother is the mucky looking substance at the bottom of the jar that contains pectin, beneficial bacteria and enzymes.  Read this website article to learn more from bodyecology.com.

Enjoy making this a habit every day!

Mote Pillo Recipe: Healthy Breakfast with Hominy & Eggs

Hominy is a great ingredient to use in your healthy recipes.  According to this LIVESTRONG.com article, hominy is low in calories, fat and sugar and high in fiber!  Hominy's taste and texture make it a great alternative to pasta.  Below you will learn how to make a popular breakfast recipe from Ecuador called Mote Pillo.  It is easy to make, delicious and healthy!

Mote Pillo ingredients:

1 tablespoon lard or olive oil
1/4 onion diced
6 eggs
1/4 cup milk
1 29 oz. can hominy
1 tsp achiote for color (optional)

Cooking instructions:
Saute onion over medium-high heat.  Meanwhile mix the eggs and milk together in a bowl.  Add hominy in the pan with the onions and cook for about 5 minutes or until tender but not mushy.  Add in  mixed up eggs, cook until the eggs are cooked but still creamy.  Serve hot.  Sliced tomatoes make a great side for this dish.  Enjoy!
More hominy facts and pictures:

Nutrition facts 29 oz. can of hominy: 5 grams of fiber (19% daily value), 3 grams of protein, 0 grams sugar, 16 grams of carbohydrates (4% daily value), 1 gram of fat 0% trans or saturated (1% daily value)

Onion and hominy sauteing.

Wednesday, July 5, 2017

Thai Zoodles Your Way

Enjoy Thai chicken with noodles without the carbs with this recipe which features spiraled zucchini "noodles" popularly called "zoodles." When my friend told me she loved Zoodles, I wasn't convinced.  But, my entire family including my husband loves them!!!
Why I think you will love this meal & spiralizing vegetables:

  • It doesn't include pasta but tastes and feels like it does.  Trust me.  If you have never used a spiralizer to make "noodles" out of vegetables you need to try it.  You can buy one for around $25.  
  • You can use the recipe below as is or use the table to customize a creation that includes the ingredients you love.

Tuesday, July 4, 2017

the You Food lifestyle: Seven Healthy Habits

Embrace and love the Seven Healthy Habits and enjoy the health and weight loss that follow.  Check back often for blog posts that discuss each and provide recipe ideas and inspiration.

The "You Food" Lifestyle

I will share with you in a series of blog post entries, the guidelines I used from several diet plans and tips that resulted in me reaching my goal weight faster than expected: 20 pounds lost in ten months.

I was that girl with a huge appetite that ate more than the average man.  I am still that girl but now, I truly love eating healthy foods something I and my friends and family are shocked to hear.  When I slip and eat bad food my body quickly reminds me that I love healthy foods, making it easy to stick with eating healthy foods.  That is something you will hear from many people but I always thought that was WAY too good to be true.  It turns out the body gets used to the benefits of healthy foods.  You will struggle, as did I in the beginning but after some time eating healthily you too will find that your body craves good food, making it easy on you to stick with it.

I call this the You Food Lifestyle ©.  Notice this doesn't say the You Food Diet.  That is key.  Also, notice You is listed first.  This is not a short-term diet plan to be dreaded. This is about YOU creating a Food Lifestyle that works for YOU for the long-term.  This is a lifestyle to look forward to.  To be inspired by that becomes a natural habit vs. something you have to try to stick to.

I am not a nutritionist nor a dietitian.  I am just a regular person that struggled with eating bad things resulting in gaining 20 pounds over the course of several years.  I will not and can not promise you a minimum amount of weight lose you will expect and how long it will take.  What I will offer you is my success story and the simple guidelines I followed to get there.   Before I started the You Food Lifestyle I tried other diets that I couldn't stick with such as Clean Eating, South Beach and Weight Watchers.  Now, I am not saying that these diets do not work.  They do.  But, what I am saying is I struggled with following any of those diets to a tee.  Weight Watchers by far worked the best for me and it is the foundation for the You Food Lifestyle, but so is the South Beach diet and the Clean Eating diet.  The You Food Lifestyle uses guidelines from all three diets plus other healthy eating tips.  YOU will create your own Food Lifestyle that you love and works for you.  I hope you enjoy these blog entries and have your one success reaching your weight loss goal with the You Food Lifestyle.


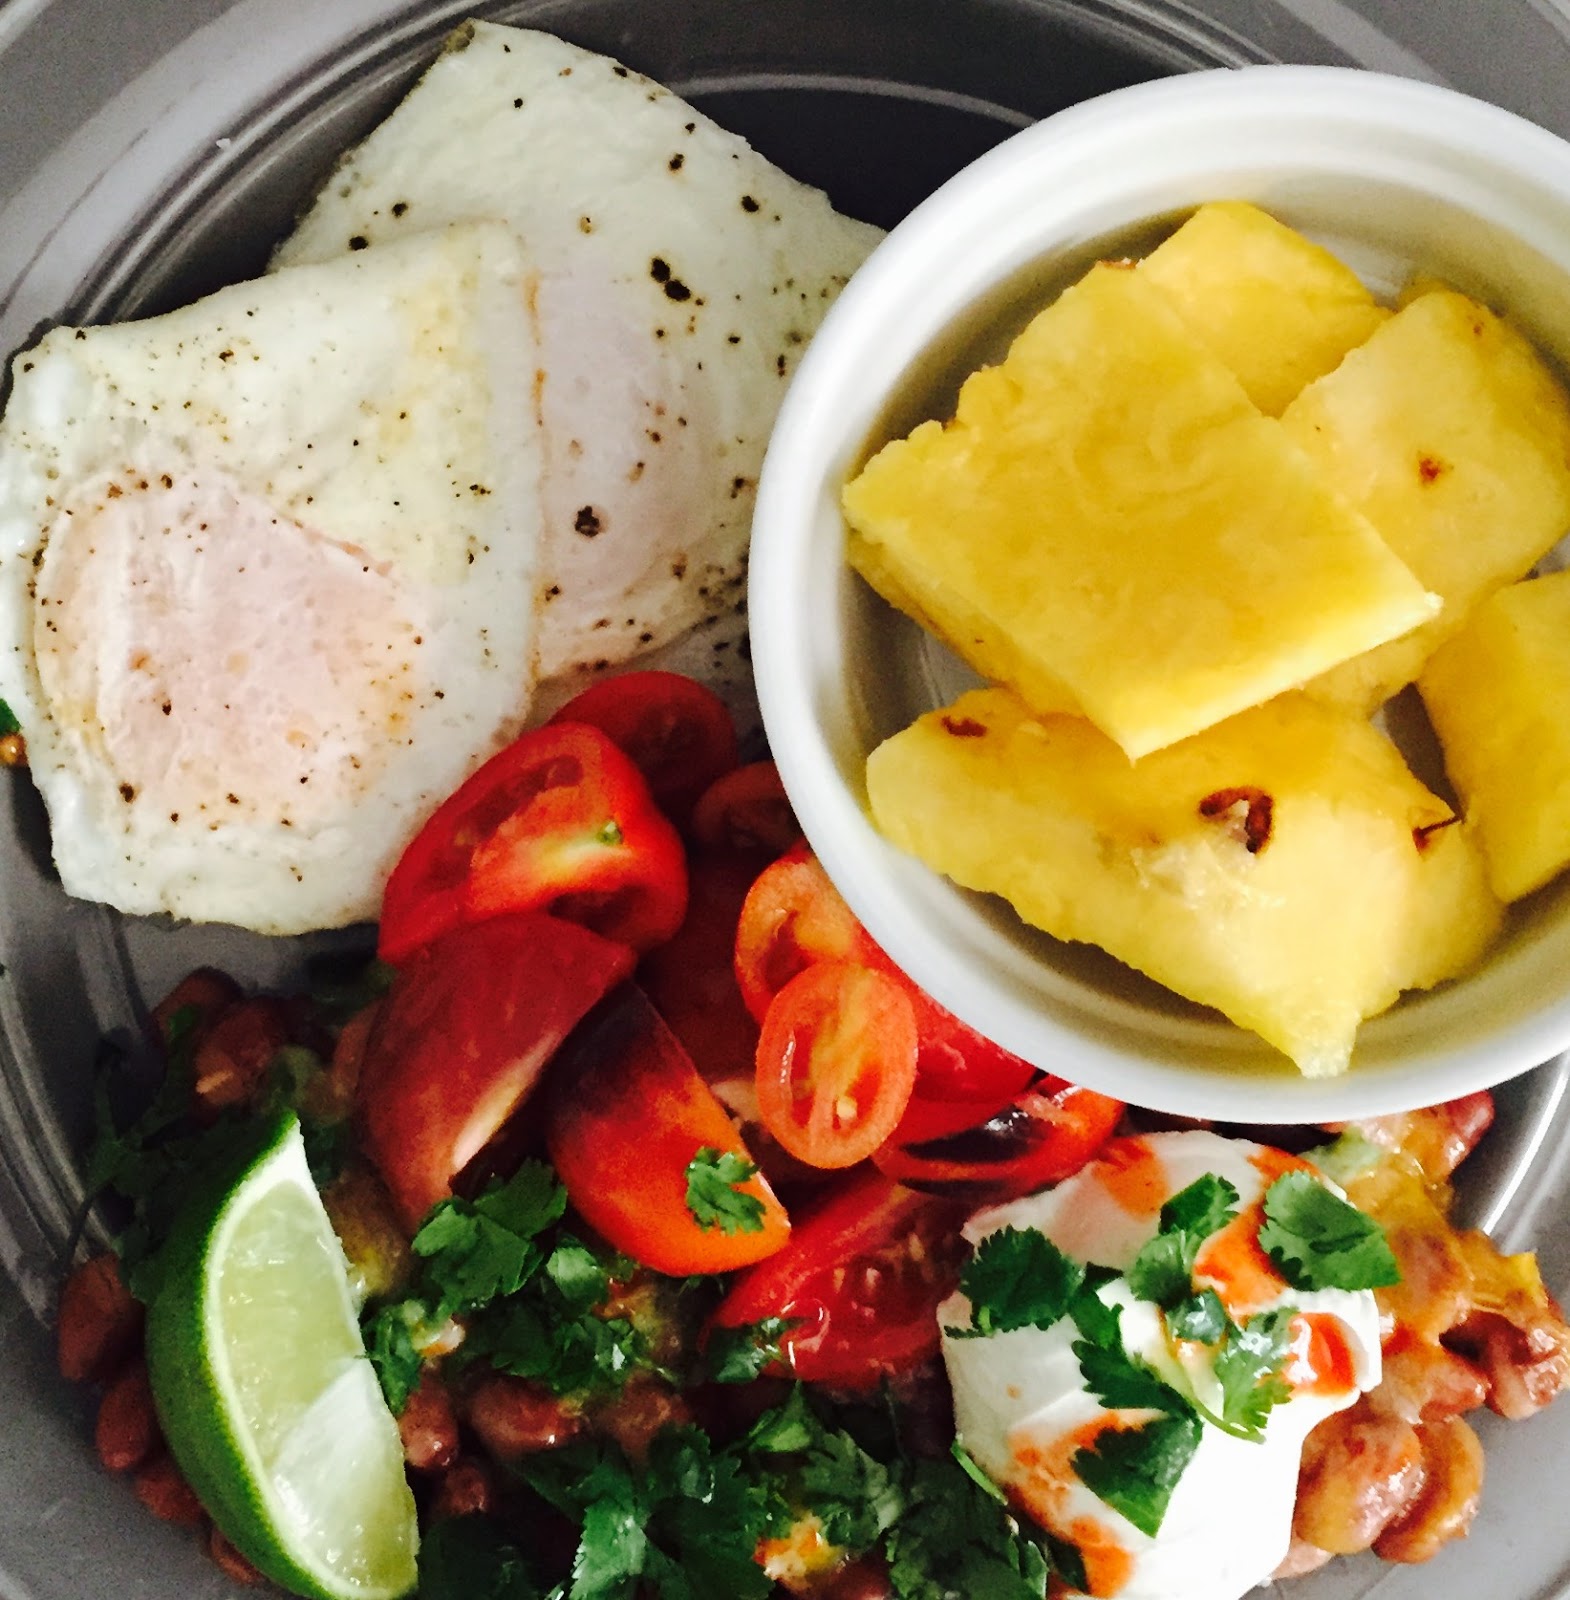
Cheesy Mexican-Style Beans with Eggs

Post Purpose: one recipe guide for putting together your own healthy recipe.

This is a guide of how to create
Cheesy Mexican-Style Beans with Eggs:
Pinto beans, monterrey jack cheese,
 chopped jalapenos, sliced tomatoes, hot sauce, sour cream,
squeezed lime juice & cilantro.
a healthy, low carb, high protein meal that is flavorful and satisfying.
This recipe doesn't include any carbs from bread products, instead it is high in protein due to the eggs, beans and cheese. However, if you are using the Weight Watcher's diet as a guide, adding one tortilla to this meal only accounts for around 2-3 points which isn't a large percentage of a typical daily point allowance.

The key to this meal is to allow each person to add the flavors that they love such as jalapenos, salsa, hot sauce, sour cream, etc. Try loading it up with tons of tomatoes and even better if you can add vegetables to it! Consider serving it with a side of fruit as shown in the image on the right.

Recipe Framework: 
This meal can be enjoyed at breakfast, lunch or dinner.

  • Ingredients:
    • Eggs - fried, over-easy, scrambled, boiled, etc. Canned beans - pinto, kidney, lima,black beans, etc. 
    • Cheese - Monterrey jack, cheddar, colby jack, etc. 
    • Flavors for the beans: jalapenos, fresh cilantro, salsa, hot sauce or any sauce you like, squeeze of lime or lemon, sour cream, etc. 
  •  Put it together: 
    •  Put the beans in a microwave safe dish and put the cheese on top. Microwave for about 1 1/2 to 2 minutes. 
    •  Meanwhile, cook your eggs the way you choose or the way each person chooses! 
    •  Then plate everything and let everyone add the flavorings they want. 

The goal here is for everyone to be excited about the meal and the control they have over the taste of the meal. 


Remember the mantra, "It isn't what you can't eat but what YOU DO EAT." 
Help your brain associate pleasure with healthy foods by thinking about 2 main things every time you eat healthy foods:

  1. How amazing the food tastes.
  2. How the food will improve your body and mood.  

Sunday, June 29, 2014

Squash Burrito Recipe

Squash Burritos with Cayenne Pepper Sour Cream Sauce

 Our garden is overflowing with squash so we are always looking for creative recipes that will allow us to gobble it up!  Here's a simple recipe that I hope inspires you to use your garden goodies in a new way!  If you have any recipes using squash please leave me a comment.

For the Sauce:  Be creative with your sauce!  You may decide to add more pepper, a different pepper or no pepper at all.  Control the thickness of the sauce by adding more or less flour.  Make a cold sauce instead by combining sour cream, broth and your favorite seasonings.

Cayenne Pepper Sour Cream Sauce Ingredients:

1/2 cup butter

1/4 chopped onion
3/4 cup flour
1 - 2 teaspoons chopped cayenne pepper (I used our frozen cayenne peppers from our garden last year.)
1 - 2 teaspoons dried cayenne pepper
1/2 teaspoon garlic powder
Salt and pepper to taste

3 cups chicken broth
1 cup sour cream

Instructions: Over medium heat, melt butter and saute onions and pepper.   Once cooked, add flour, garlic powder, cayenne pepper, salt and pepper and stir to combine and cook while stirring for a couple minutes.  Then, whisk in the chicken broth until combined.  Cook over medium heat until thickened to desired consistency.   Turn off heat and stir in sour cream.  Taste and add more seasonings if needed.  Set sauce aside.

For the burritos:

Use whatever squash you can get your hands on!  For this recipe I used 1 zucchini and 1 & 1/2 yellow squash.   I used taco - sized shells and ended up with 20 burritos.  Just like the sauce, use your creativity to create the burrito stuffing mixture. 


Burrito Ingredients: 

Olive oil or other cooking oil

2-3 medium-sized squash cut into 1/4 inch thick half circles
1/2 onion chopped
1 lb. cooked ground beef
1 teaspoon cumin powder
1/4 teaspoon garlic powder
1/2 teaspoon chili powder
Salt and pepper to taste
Prepared cayenne pepper sour cream sauce
Tortillas
Shredded cheese (I used Colby Jack.)

Instructions:  Pre-heat oven to 350 degrees.

To prepare the filling:  Saute squash and onions in olive oil over medium-high heat until tender but slightly crisp. Stir in cooked ground beef.  Add cumin powder, garlic powder, chili powder and salt and pepper and stir to combine.

To make the burritos:  In a 9x13 pan add enough prepared sauce to cover the bottom of the pan.  Fill tortillas with about 1/4 cup filling, add cheese and a teaspoon of sauce, roll up and place in prepared pan.  Once all the burritos are prepared, pour the remaining sauce over the burritos, cover with cheese and bake for 15 - 20 minutes.

Garnish, serve and enjoy!  If you happen to have squash blossoms or any other edible flowers consider using them as a garnish.  We have borage flowers in our herb garden that we served. 


Monday, June 23, 2014

Herb Garden Update June 23, 2014

My only flowering Chamomile
It's been a couple months now since I planted my herbs.  This being my first year growing herbs, I have to say I didn't have 100% success.  Out of all the herbs I planted, only the following survived:  Chamomile, Valerian, Wormwood, Hopps, Borage and Lavender.

From those listed above, I am happy with all except for the Chamomile.  Unfortunately, I chose a poor location for them.  Despite being trampled by our dog daily and receiving less than ideal sunlight, they are still alive.  They are growing slowly and one plant started flowering a few days ago.

Valerian


Wormwood

 My Valerian and Wormwood are thriving in the same bed.  When I first planted them they were so delicate and small.  Every time it rained their leaves would stick in the dirt.  Finally, they started to take off.


Our Hopps plant has grown well from the start.  We planted it next to our fence and clothes line and tied a string from a stake in the ground up to the cloth's line so it could vine.  It has nearly reached the top of the clothes line now.

Mt. Hood Hopps
My Borage has started to flower.  I planted the borage directly in the ground in April.  It steadily grew for the past two months in it's own bed.  I have about 10 - 15 plants and about 1/3 have flowers.

According to my research, the best time to harvest borage leaves is prior to flowering.  I plan to harvest some leaves soon and dry them in our dehydrator.  I will then store them in a glass jar.  Dried Borage leaves can be stored and used medicinally for:  skin problems such as inflammation, cold symptoms, PMS symptoms and to aid in digestion.

The flowers are edible.  I am going to start using them in salads and as a garnish.   

Borage
My Lavender has required a little work.  It wasn't growing well in our dense Alabama soil.  After doing some research I realized it needed more drainage and lighter soil.  So, I made a raised rock bed and filled it with a mixture of composted soil and sand.  After being replanted, my Lavender has almost tripled in size.  Although it hasn't started to flower yet, I am optimistic that it will continue to flourish in its new home.

Lavender


Wednesday, June 18, 2014

New Video Series - Cooking for Gardeners

Lately, I've really been into looking up recipes for things that I am growing in the garden. I've started a board on Pinterest called "Recipes from the Garden"
 Recipes from the Garden Pinterest Board

I've also decided to start a Youtube video series called "Cooking for Gardeners". My first video is about stuffing Pattypan Squash. It's not really a recipe but more of a technique. Check it out!


Friday, June 6, 2014

Seed Giveaway!

In an effort to get subscribers to our new Youtube channel, we are giving away free organic, heirloom seeds! Please see the video here for more information:
Seed Giveaway Youtube Video

List of Available Seeds

Marketmore 76 Cucumber (4 giveaways at 10 seeds each)
Rugosa Friulana Yellow Squash (2 giveaways at 10 seeds each)
Table Queen Bush Acorn (1 giveaway at 10 seeds)
Red Marconi Bell Pepper (5 giveaways at 20 seeds each)
Mortgage Lifter Tomato (2 giveaway at 10 seeds)
Fengyuan Purple Eggplant (2 giveaways at 10 seeds)
Pantano Romanesco Tomato (3 giveaways at 10 seeds each)
Tabasco Pepper (3 giveaways at 10 seeds each)
Bush Buttercup Squash (3 giveaways 10 seeds each)
New England Sugar Pie Pumpkin (1 giveaway at 10 seeds)
San Juanito Tomatillo (2 giveaways at 20 seeds each)
Hungarian Heart Tomato (2 giveaways at 10 seeds each)
Purple Jalapeno (2 giveaways at 10 seeds each)
Jarrahdale Pumpking (1 giveaway at 10 seeds)
1 Luffa Gourd (1 giveaway at 10 seeds)

Thanks for supporting our new channel!

***Note: Any information such as mailing address will be kept confidential and will not be given or sold to anyone.***

Thursday, June 5, 2014

Grinding Corn into Cornmeal and Making Cornbread

Grinding corn is not hard if you have a little time, a little muscle, and the desire to have amazing cornbread. Learn how to do it in our new youtube video.
PS - We bought the Estrella grinder at a Latino grocery store for about $30.

How to Grind Cornmeal and Make Cornbread Video

New Youtube Channel

So, we have decided to create a Youtube channel to share our gardening and homesteading life. Please take a look!!

Alabama Homesteading Youtube Channel

Friday, March 28, 2014

How to Make Homemade Kombucha Part 1: Making Scoby


Kombucha is a fermented tea that contains probiotics.  In this blog post, I'll describe how to make part one of Kombucha .... the Scoby.  Scoby stands for:  Symbiotic Culture of Bacteria and Yeast.  The Scoby feeds off the caffeine and the organic sugars resulting in beneficial probiotics.
Scoby purchased from Kombucha Kamp


After the Scoby is complete, you can use it to create Kombucha tea.  You can find this tea in health food stores for about $3 to $4 for 16 oz.  Making your own at home will save you money considering you only have to make the Scoby once.  Each time you use the Scoby to create the Kombucha it will yield a "baby" Scoby.  From there, you are just using one Scoby, 8 teabags, water and sugar to yield one gallon of Kombucha.


Scoby supplies/ingredients:                               

1 glass container at least 1/2 gallon-sized
Cheese cloth and a rubber band
Strainer if using loose tea
Sauce pan
1 liter of water
3 black teabags or the equivalent in loose tea
1/3 cup sugar
1 bottle of Raw Kombucha
                                                  

Step 1: Make tea.  Pour 1 liter of water into a sauce pan.  Heat water until boiling and turn off heat.  Add the tea bags/tea.  Let steep for the amount of time indicated on the tea's package.  Remove tea bags or strain and then stir in sugar.


Step 2:  Pour tea into glass container.  Once the tea is completely cool, stir in one bottle of Kombucha.


Step 3:  Cover the lid with cheesecloth and secure with a rubber band.  Store in a cool, dark place for at least 5 weeks or until you see a thick film form at the top.

Note:  The ideal temperature for creating Scoby is 80 degrees Fahrenheit.  We place our Kombucha on a heating pad since we don't keep our house that warm.   


Started Scoby March 22, 2014
Scoby formation photos:  I'll keep this blog updated with new images so you can see the process!


How to Make Homemade Kombucha Part 2: Making Kombucha Tea


Kombucha tea is extremely easy to make as long as you have a Kombucha Scoby and starter mix.  Check your local health food stores or purchase one online.  You can also make your own Scoby; for instructions view Part 1 of this blog:  Making Scoby.  We didn't want to wait for our Scoby to form to start making tea so we purchased a Scoby online from Kombucha Kamp.


To make Kombucha tea you will need the following ingredients:

1 Kombucha Scoby with starter mix
8 black tea bags
1 gallon bottled or filtered water
1 cup sugar
1 sterilized glass container
Breathable cloth such as cheese cloth
Rubber band elastic hair band


Kombucha Tea Instructions:

1. Make black tea:  Boil some or all of the 1 gallon water and steep the 8 black tea bags.  Remove tea bags and stir in sugar and the remaining water.  Let cool completely.

2.  Once cool, pour tea into the glass container and add the Scoby and starter mix.  Finally, cover the glass container with the cloth and secure with a rubber band.  Store in a warm place for about 1 1/2 weeks until tangy.  You will notice a new "baby" Scoby has formed.

Scoby purchased from Kombucha Kamp
Note:  The ideal temperature for fermenting Kombucha is 80 degrees Fahrenheit.  We place our Kombucha on a heating pad since we don't keep our house that warm.   

3.  Once ready, consider pouring Kombucha into sterilized glass bottles.  Store tea in the refrigerator for up to 3 months.

4.  Now you can repeat the process and make new Kombucha tea using 1 of the Scoby.  Store the new "baby" Scoby in a glass container covered with the Kombucha tea you just made.  Place a breathable cloth on the glass container and secure with an elastic band.  You can store the Scoby for months just make sure you check it periodically adding more Kombucha to keep the Scoby covered.


Thursday, March 27, 2014

No Sacrifice Eat - Clean Enchilada Recipe


We are striving to eat healthier: no processed foods, organic vegetables and fruits, organic meats, etc.  Tonight, we needed something that tasted indulgent without compromising our diet.  Introducing ..... my enchilada recipe! I just had to share because they are absolutely delicious, healthy and the best enchiladas I have EVER made.  That star ingredient is: Ezekiel 4:9® Sprouted Whole Grain Tortillas

I hope you enjoy it as much as we did!


Enchilada Sauce Ingredients:

1 - 14 oz. can low-sodium tomato sauce
1 cup water
2 1/2 tablespoons chili powder
1/2 teaspoon cumin powder
1/2 teaspoon onion powder
1 1/2 teaspoons garlic powder
1 tablespoon sugar, honey, or other sweetener (optional)
2 teaspoons salt
1/2 teaspoon pepper
3 tablespoons whole wheat flour (or flour of choice)

Sauce Instructions:

Combine all ingredients in a medium - sized sauce pan and heat over medium - low heat until simmering and slightly thickened. Remove from heat and set aside.

Enchilada Ingredients (makes 12 enchiladas)

1 package of Ezekiel 4:9® Sprouted Whole Grain Tortillas
1 cooked and shredded chicken breast
1/2 can low-sodium pinto beans
1/2 can low-sodium black beans
8 oz. Monterrey Jack cheese shredded

Enchilada Instructions:
 
Pre-heat the oven to 350 degrees Fahrenheit.

1. Prepare the beans:  Rinse and drain the beans and place in a bowl.  Using a fork, mash the beans until you reach the desired consistency.

2.  Prepare filling:  To the beans, add and combine the following ingredients:  shredded chicken, mashed beans, 4 oz. shredded Monterrey Jack cheese, and 1/4 cup enchilada sauce.

3: Prepare tortillas:  In a medium - sized bowl, layer enchilada sauce and tortillas covering each with about 1 tablespoon before adding the next.  Let sit for 2-3 minutes maximum.

4.  Assemble enchiladas:  In a 9 X 13 baking dish, spread a thin layer of enchilada sauce.  Place about 1/4 cup filling on each tortilla and roll. Place assembled enchiladas in the baking dish and cover with 1/2 of the remaining enchilada sauce.  Place in the pre-heated oven at 350 degrees for 15 minutes.  Remove and cover enchiladas with the remaining sauce and cheese and bake for 5 minutes more.

5.  Remove let cool and ENJOY!

Saturday, March 22, 2014

Seedlings Update

It's been about 4 1/2 weeks since we started our seeds indoors.  Every variety has sprouted successfully.  We only had a few cups that didn't produce seedlings.  Today I will plant the 2 herbs that have been undergoing cold stratification for the past 4 weeks.

Seedling Pictures 3/22/2014:

Tomatoes

Mt. Hood Hopps
Herbs


Tuesday, February 18, 2014

Germination Updates - Keep Checking Back

I'll keep this post up-to-date with germination photos. 

Planted seeds:  February 15, 2014.

Feb. 18th: 2 herbs and 1 vegetable have sprouted


  Wormwood                                                                                    Chamomile 


 Pantano Romanesco Tomato


Feb. 19th:  1 new vegetable and 1 new herb sprouted

Mortgage Lifter Tomato                                                               Valerian


Feb. 22nd:  2 new herbs sprouted

Lavender                                                                                       St. John's Wort


Tomato updates:

Patano Romanesco Tomato                                                          Mortgage Lifter Tomato


Started cold stratification for Skullcap and Echinacea:  Placed seeds on wet paper towel, placed in open plastic bag and then stored in the refrigerator.

Echinacea (store for 4 week)                                                          Skullcap (store for 4 weeks)